Monday 25 November 2013

The Ugly ducklings...


...or beautiful Swans?
Sneak peak, Shuuuushhhh!
I’ve had a cheeky side project on the go now for several months, namely a small Cygnar force; not that I’ve been planning on playing the Swans particularly, just more of a circumstance to be honest.  I’ll elaborate:  I won quite a bit of store credit at the Outpost store through various ‘best army’ and tournament wins, plus they offer an extra 10% discount to tournament players on the day of an event and somehow I managed to see the shiny appeal of a Stormwall and bought one….  I fancied painting one up to be fair and had a few ideas on a basing style; initially I contemplated selling it on eBay to make a bit of money, but now he’s staying!  As luck would have it I managed to win a couple of el-cheapo bits on eBay to add to the Stormwall and at the time I’d just sold a load of old GW crap on eBay so had some spare cash…  Cygnar army… mmmmm!!

I’m unlikely to actually take the Cygnar to any events, though Iron Gauntlet is appealing (i.e. where you can take multiple factions and one of which would be the Cygnar), the project is more for painting and in particular the basing style which I will go into more detail later in the article.  The top Cygnar lists cause me and my buddies trouble in tournaments and I felt that having a ‘practice army’ was a good idea, from my point of view playing with Haley2 would highlight her weaknesses for when I play against her in tournaments I also felt it my duty to play it against my friends for their benefit (awaiting a whole torrent of abuse for that comment)!  As far as lists go I admit to ‘net-decking’ the top lists, but that is the point of the project to be fair.  Having played the eHaley, bonded Stormwall list a couple of times now it is like test driving an M5 when you’re used to a boring family car!!

Painting
With regards to painting, where this article is focussed, I opted to use the Cygnar painting guide from the faction book.  I’ve found these guides to be really good and results from following these guidelines to be similar to the studio finished product.  I made sure that the blues and whites were  well painted, i.e. several thin layers to get a good smooth finish, I like to use mixing medium to achieve this and of course lots of laborious ink lining.  The latter is a real ball ache and takes a long time, but as I do it I can really see the difference.   It makes armour plates stand out and differentiates two surfaces which may have started to merge – my best method of describing it is to make the model ‘punch’ out, a bit like a cartoon I guess.

Bases
As I noted above the basing was a key element in the project and I wanted to do a blasted urban scheme, like in the faction book artwork; I wanted to incorporate rusted metal girders, broken pipes, razor wire and standing dirty water.  I wanted to give my models some height too so I envisaged the bases being considerably higher than other models I’ve previously based.  Below are a couple of snaps of the work in progress large bases, I used various off cut plasticard girders, some GW bitzbox bits and slate for the interesting elements of the base.  For the rubble itself I used a coarse-grade railway ballast mixed into a thick paste with PVA, this made the ‘clumps’ I was after.
 
 For the painting I kept a simple grey drybrush, picking out the rusted and tarnished metal girders and various other aspects.  The water was made using GW water effects, running water was an off cut of dried hot glue gun glue.  I used a variety of green/brown washes in the water areas to add contrast.  Finally I added grass tufts and occasional bits razor wire.  I kept the majority of the base grass free as I wanted it to look like weeds growing on a mainly urban grey base, I felt that the grass was necessary to add colour to the miniatures.

The first few painted miniatures
Battle group:
*Major Victoria Haley
*Stormwall & Stormpods 
 *Squire

Haley2

Haley2

Haley2
 
Stormwall

Stormwall

Stormwall

Stormwall

Stormwall's base

Stormwall's base

Stormwall's lightning pods
 
Squire

Squire

Squire


Units:
*Arcane Tempest Gun Mages + UA and a marshalled Hunter

Arcane Tempest Gun Mages

Arcane Tempest Gun Mages

Arcane Tempest Gun Mages

Arcane Tempest Gun Mages marshalled Hunter

Arcane Tempest Gun Mages marshalled Hunter

Arcane Tempest Gun Mages marshalled Hunter
I’ll be starting work on the Black 13th soon, then some solos and finally some Stormlance cavalry so watch this space!


Monday 4 November 2013

More X-Wing

In the last article I posted a few photos of my retouched X-Wing minis.  The extra paintwork was just a few minutes work, but enough to improve the models and make them a little more unique.  Below are a couple of snaps of the missing ships I mentioned:

INSERT IMG HERE

YT-1300
A buddy of mine had found some cool Falcon mods on eBay and figured I should have a go, after a little research on Wookiepedia I discovered that the YT-1300 freighter was often heavily modified, with cockpit alterations etc.  I liked the idea of shifting the cockpit to the centre to have two different looking ships for my games.  The Star Wars expanded universe agreed with the idea too, naming the "YT-1930" as a later mainstream design with a central cockpit.  During my research I found a guide (on this site) on how somebody else managed to do it, so I had no choice but to break out the hobby knife and razor saw and begin to hack...

Conversion details
The first job was to remove the original cockpit, but preserve the rounded tunnel part and nose whilst not invading the surrounding saucer section too much.  I also removed the two front sections of the original hull in preparation for the new cockpit position.  Everything was filed down and cleaned up ready for the conversion, but most notably the tunnel section was reduced to just the top part, I used a razor saw and a jig to get the cut accurate.  Lots of filing and dry fitting was done to get a good fit.  Below is a photo of the Falcon in bits!

As you can see there is a gaping hole on the starboard side as well as a big ugly, square front!  Note also the two blaster turrets and radar dish were removed for ease of painting and cutting, they're quite delicate and could have gotten damaged if they were left in place.
Once the dry fitting was complete I superglued the cockpit and cockpit tunnel into position and started measuring up the plasticard to fill the gap left by the original cockpit removal.  This was relatively simple to rebuild the basic shape as well as add in some panel details.  I used liquid greenstuff and more filing to get a decent finish.  Below are a couple of snaps of the finished conversion ready for priming and painting:
Cockpit and tunnel glued in place, plasticard and greenstuff complete

Underside; a bit of edge rebuilding and a lot of filing/filling to get a smooth finish

The side view, basically where the original cockpit was sited

Close up of the finished panel.  I added a couple of gubbinz off the discarded original parts to replace some detail.
YT-1930
For the paint job I decided to prime over the original paintwork, a little risky as the detail is so fine, but I felt it would be OK and the final paint job wasn't compromised in my opinion.  Below are a few snaps of the finished model, ready to out manoeuvre a few Imperial star destroyers or just smuggle something naughty!
Completed YT-1930

Completed YT-1930

Completed YT-1930
Completed YT-1930 next to the original YT-1300

Wednesday 23 October 2013

ALong time ago in a galaxy far, far away...

Star Wars X-Wing Miniatures (by Fantasy Flight Games) Game repaints.

Well I wouldn't go as far as to say repaint, but rather a touch up of the stock miniatures paint jobs.  You buy the models, for those of you who haven't seen the game, prepainted.  The models are very small, but detail is still present, pretty much as good as the original models from the 1977 film props, just much smaller in scale.  The back of the main rulebook contains some details on this.

The game is pretty good, quite tactical in fact, I've not played it a lot, but just started again recently, the dog fighting style of game is quite cinematic and if you like Star Wars then you'll love this!

The models all come prepainted as I mentioned above, but the panel lining and quality varies quite a bit.  As the ships are very small this has been quite forgiving.  I did some research and lots of painters have stripped down the models and fully repainted from scratch - possibly the best method.  I however opted for a retouch approach and simply washed the Imperial ships with a black wash.  This had the dual effect of darkening the whole model, but picking out all of that detail I noted above.  As the original wash was somewhat sporadic the effect was of benefit.  I didn't wash the Rebel ships (other than the Y-Wing) to preserve their brighter colour, but mainly opted to re-ink-line the panels, most notably the Lambda Shuttle.

The original paint job was very basic with just one or two colours, so I added silver pretty much where all of the engine and weapon areas where, again a black wash was used to bring out the detail.  The other thing I did was to paint in the engine glows, which are just blank on the original paint jobs.  Some have a neon blue/white glows such as the Falcon and Lambda Shuttle, others red such as the X-Wings, Slave 1 etc.  I also added a couple of green or red laser lights and painstakingly painted the R2 units to add a little flavour!

Below are a few snaps of my retouches, of course if you haven't seen the originals they won't mean squat!!!

Two Firespray's Slave 1 in correct colours on left!

Three X-Wings, photo hasn't picked out the engine glows unfortunately :-(

Better view of the X-Wings, I think the silver weapons and engines just stand out enough!

Y-Wing and B-Wing, the Y-Wing had quite a lot of retouching whereas the B-Wing very little.

Rear shot of the Y & B Wings, think you can just see the red engine glow on the B-Wing!

TIE Bomber and TIE Advanced

TIE Bomber and TIE Advanced rear shot

TIE Fighter front and rear
I'll try and take some snaps of the Lambda Class Shuttle, Falcon and rear shots of the Firesprays to complete the images of the retouches.

Hope you liked the article :-)

Wednesday 16 October 2013

From Khador with Love


It’s been a while since my last post, but that is not to say that I haven’t been hobbying.  To be fair I’ve done quite a lot of painting recently and this article will simply be a showcase of the Khador stuff I’ve recently completed.


For some unknown reason I found a burning desire to get back into the Khador after quite some time without fielding the my red army.  I knew that I had a couple of small coming up, the recent Bridgeford Bloodshed 2 and the imminent Frontlines 3.  I intended to get the armies fully painted for both of these events, but fell short of the painting mark for the former, so took the Menoth to that.  I actually did quite well at BB2, coming fourth – which was exactly where I came at the last one!  I went 3-1 on the day, the second through to fifth places (possibly beyond) were sorted via SoS, so not a lot I could do to better myself, other than to have won all four!  Superb event and looking forward to the next one :-)

So, the Khador; I decided to build a new list and went for Irusk2, I had played him a bit acouple of years back but decided to try him out again with the following list:

Irusk2
*Spriggan (bonded)
10 Iron Fang Pikemen with Black Dragon UA
5 Man-O-War Shocktroopers
10 Nyss Hunters with Valachev
Winter Guard Mortar Crew
Great Bears of Gallowswood
Man-O-War Drakhun
Iron Fang Kovnik

The second list was a copy of my 35 point Irusk1 list with the addition of the Iron Fang Kovnik and Saxon Orrik.  It isn't exactly the best pairing with Irusk2 as they both answer and pose the same questions, but it does let me field the mighty Konquest, which is all good.  I’ll focus on the Irusk2 list as this was what the project was all about to be honest.  The list has changed a bit, initially there were two mortars with the idea of cycling the Fire for Effect spell, having two fully boosted mortar shots per turn, I had Widowmakers and Kell Bailoch too, but the Drakhun and Great Bears found their way in, the Drakhun for speed and the Bears because, well they're great!  It is fairly balanced with some decent melee output as well as ranged threat, I do however think the lists will get raped by the current meta power casters such as Haley2, Morvanah2, Vayl2 and Lich2, the less powerful ones will probably bone these lists too!

I will be fielding the two fully painted lists in a week or so at Frontlines 3, I’ve been drawn against Jamie P, who is arguably the best player in the UK and winning Templecon Masters with Khador, so my chances aren’t that great to be honest!!!  But what the hell, I’m looking forwards to pushing my models around the table and having a bit of a laugh – considering the field of players and the army lists that have been submitted mine look like the worst there, practically friendly, so anything other than last place will be a bonus ;-)

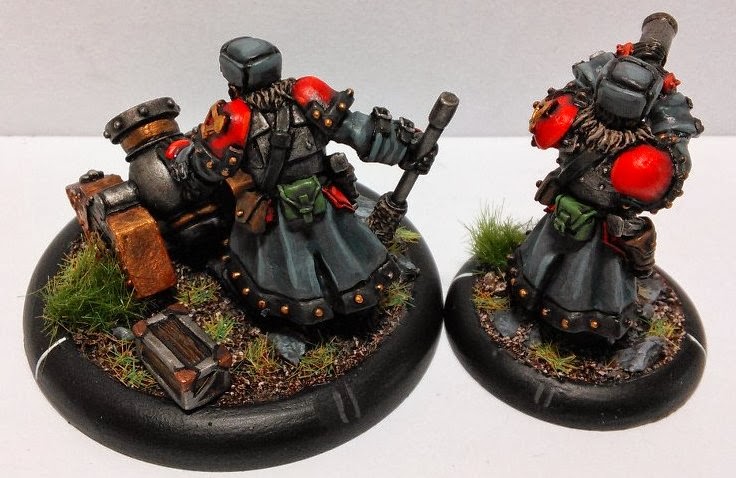
Below are the photos of the recently painted Khador stuff for the two lists (mainly the Irusk2 list):
Man-O-War Drakhun (with dismount)

Man-O-War Drakhun (with dismount)

Man-O-War Drakhun (with dismount)

Nyss Hunters

Nyss Hunters

Black Dragon Iron Fang Pikemen Officer & Standard

Iron Fang Kovnik

Iron Fang Kovnik

Iron Fang Kovnik

Supreme Kommandant Irusk

Supreme Kommandant Irusk

Supreme Kommandant Irusk

Supreme Kommandant Irusk

Supreme Kommandant Irusk

Winter Guard Mortar Crew

Winter Guard Mortar Crew

Man-O-War Shocktroopers

Man-O-War Shocktroopers

Man-O-War Shocktroopers

Kaptain Valachev


Kaptain Valachev

Saxon Orrik

Saxon Orrik